A line drawn in confident pen and ink carries something a quick flash design never will — and that conviction is exactly what a custom tattoo design is built on, mark by mark, over weeks rather than minutes.
People reach out to me all the time wondering what actually happens after they say “yes” to a commission. The fear of the unknown is real, and I get it. Nobody wants to invest serious money in something this permanent without knowing how the whole thing flows. So let me walk you through the entire process from start to finish, with nothing skipped and nothing hidden.
Step One: The First Conversation
Every custom tattoo design starts with a conversation, not a sketch.
You message me with the spark of an idea — even if it’s blurry. Maybe you know you want something honoring your grandmother but you’re not sure what shape that takes. Maybe you have five Pinterest screenshots that all share a feeling but not a single clear image. That’s normal. That’s exactly where we begin.
From there, I ask questions. Who is this piece for, even if it’s for you? What story does it carry? What size, and where on your body? What kind of art moves you in general? And just as important — what do you absolutely not want anywhere near it?
This step matters more than people realize, and it’s a big part of why choosing an artist for your tattoo commission is such an important decision. The right design grows out of the right understanding, so I take my time here and never rush it.
Step Two: Reference Gathering and Concept Direction
Once I have a clear feel for what you’re carrying, I pull together references and propose a concept direction.
These references aren’t pieces I’m going to copy. Think of them as visual anchors — line weight examples, composition ideas, symbolic elements that connect back to your story. This is where your input genuinely shapes the whole piece. You either say “yes, that’s the feeling,” or “no, push it this other way,” and we adjust together.
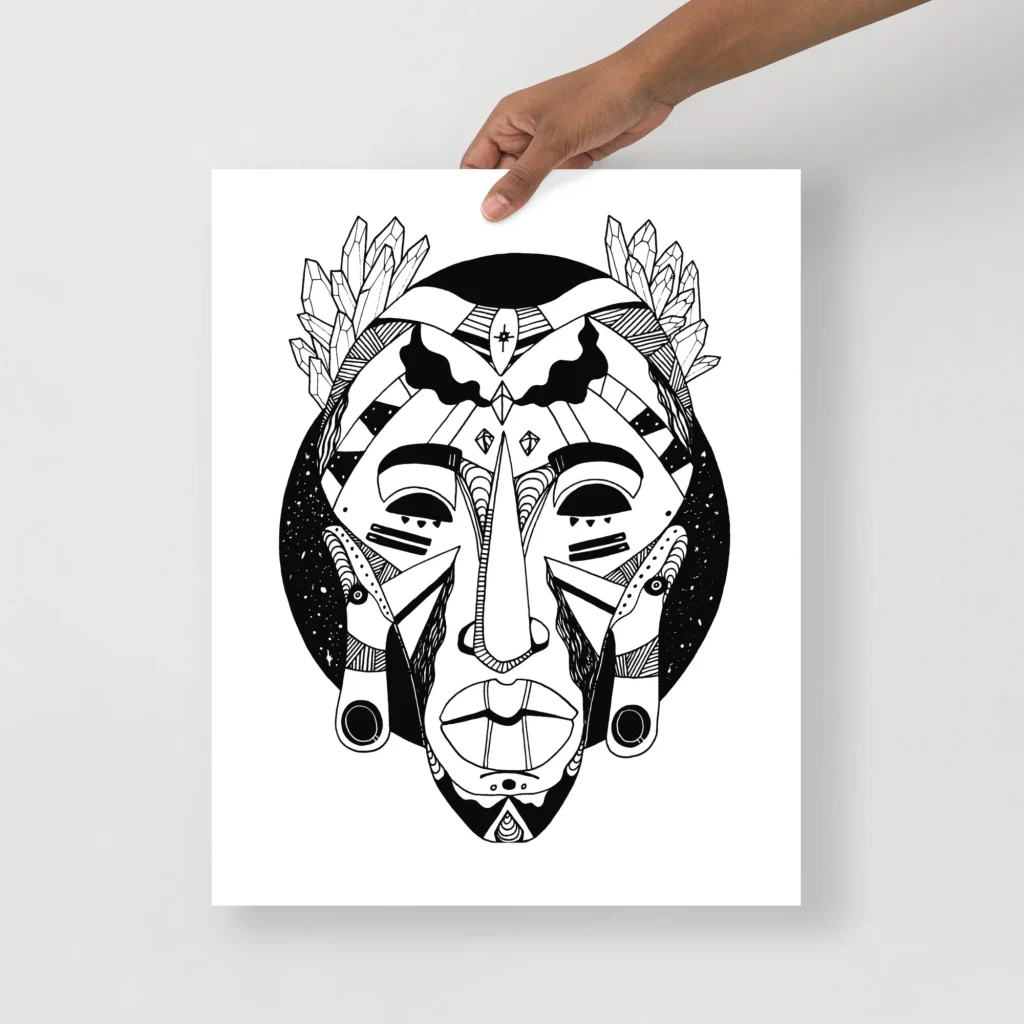
A good example of the kind of symbolic, culturally rooted imagery I draw from is my african mask art Print — a tribal pen and ink drawing where every mark carries meaning. That same intentionality goes into the reference-gathering phase of every commission. We lock the direction before any real sketching happens, so if anything feels off, this is the moment we catch it.
Step Three: First Rough Sketch
Now I sketch. This first pass is intentionally rough — pencil, gesture, layout. It’s not pretty yet, and it’s not supposed to be.
What I’m showing you here is composition. Where the elements sit. How they relate to one another on the area of skin you chose. The basic shape and flow of the piece, before any detail gets layered in.
Then you give feedback. Maybe the central figure needs to face the other direction. Maybe the symbolic element on the left needs to be bigger. However small the change, this is the moment to speak up. Nothing is precious yet, so we can move freely.
Step Four: Refined Sketch With Adjustments
After your feedback, I clean up the composition and start bringing real detail in. Now you can finally see the personality of the piece coming through.
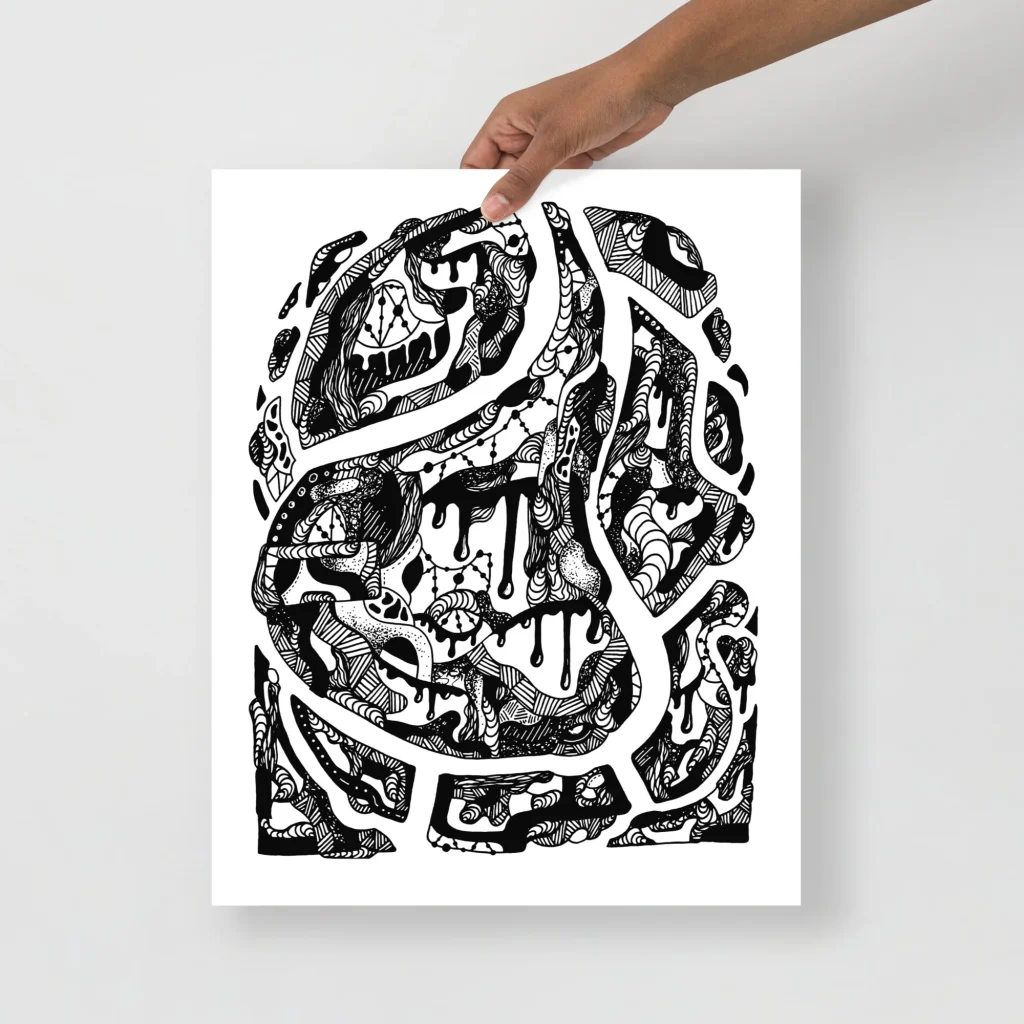
My Abstract Line Art Print — Wave of Thoughts No. 3 — shows how a design evolves through layered line work. What starts as loose gesture gradually becomes something with real rhythm and intention. That same evolution happens in the refinement stage of a commission. This is also where we settle any final compositional changes before I move into ink. Once pen hits paper for real, big changes get harder — but small refinements are still on the table.
In fact, most clients ask for one or two small tweaks at this stage, and that’s precisely what this step exists for.
Step Five: Final Pen and Ink Artwork
Now I draw the real thing. Pen and ink. Hand-drawn. The line weight, the negative space, the texture — all locked in for a design that will translate cleanly to your skin.
This is the longest part of the journey. Depending on complexity, it takes anywhere from a few days to a couple of weeks. Each line is intentional. There’s no “fix it later” with pen and ink — every mark is committed the moment it lands.
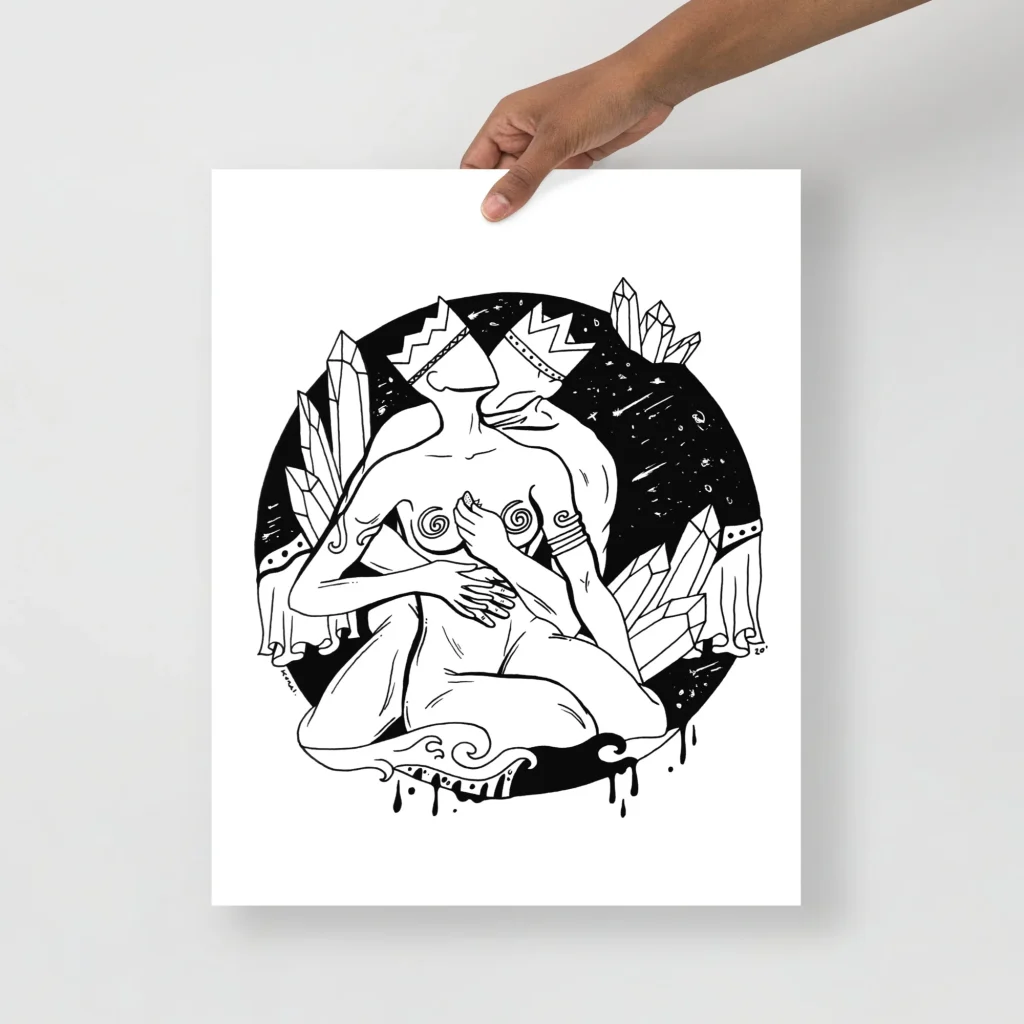
My Galactic Lovers couple art Print is a strong example of what this stage produces — two figures rendered entirely in pen and ink, where the interplay of fine lines and open space creates depth and emotion without a single drop of color. That level of detail and commitment is what I bring to every custom piece at this point.
Why this matters for tattoos
Tattoo needles work best with intentional, confident line work. A piece drawn with that same energy translates beautifully onto skin — and what makes an ink drawing a timeless work of art is exactly that commitment to every single mark.
Step Six: Final Files and Tattoo-Ready Delivery
When the artwork is finished, I deliver it to you in tattoo-ready format.
That means high-resolution files (PNG and PDF), proper proportions for your chosen placement, and clean line work your tattoo artist can stencil from directly. You get the original drawing too, if you’d like it shipped to you — many clients frame theirs as a keepsake long after the ink has healed.
So when you walk into the tattoo shop, your artist doesn’t have to invent anything in the chair. They focus on what they do best: putting the line down right.
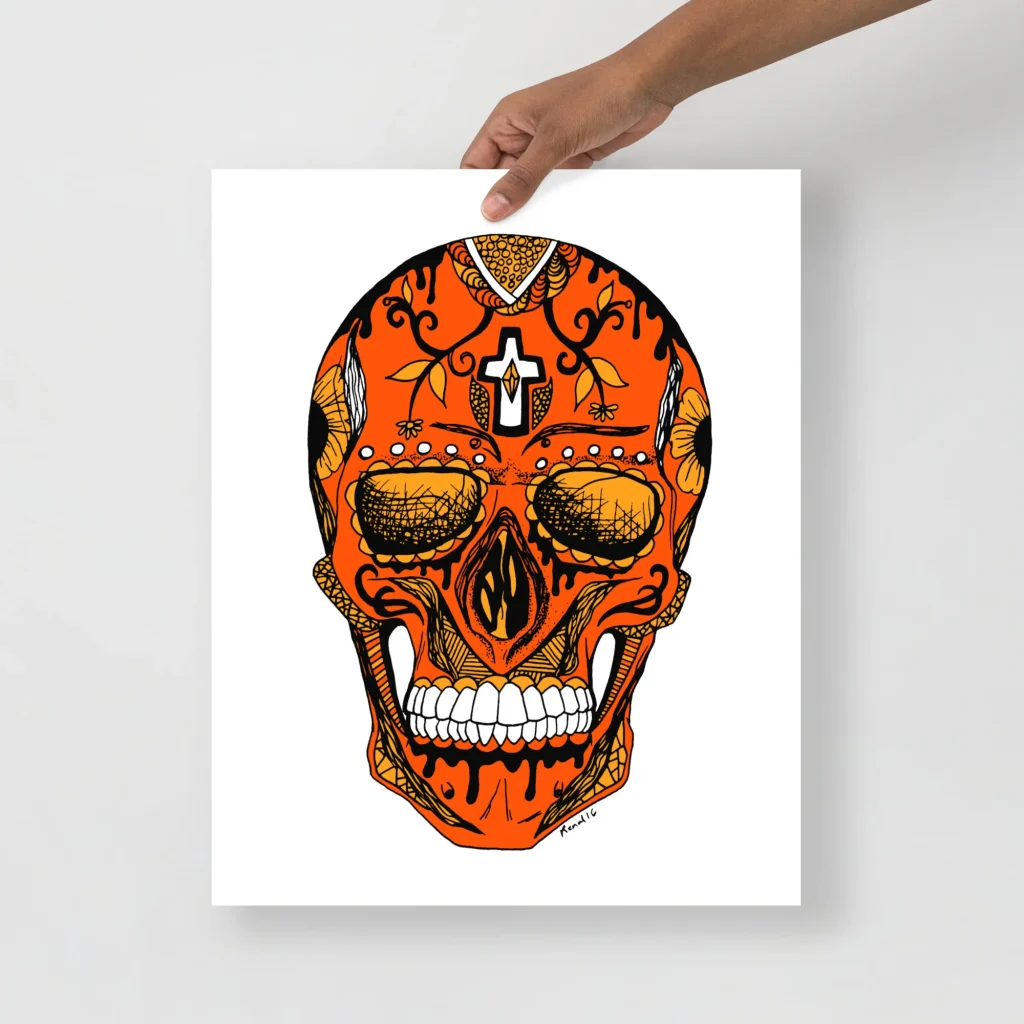
My Day of the Dead skull art Print — Los Muertos Pen & Ink — is a great example of the kind of finished, tattoo-ready line work I deliver. The bold outlines, intricate interior detail, and clean negative space are all drawn with skin in mind. A piece like this hands your tattoo artist everything they need to do their best work.
Step Seven: Working With Your Tattoo Artist
I always recommend sharing the design with your tattoo artist before your appointment. They might suggest tiny adjustments for the body — like fine-tuning line thickness for how it will hold up over years on skin, or shifting placement based on muscle anatomy.
These tweaks are normal and welcome. Your tattoo artist knows skin. I know paper. Together, the piece reaches its true final form.
How Long the Whole Process Takes
Most of my commissions run four to eight weeks from first message to final files. Larger or more complex pieces can take longer. Simpler ones can move faster.
If you have a target tattoo appointment in mind, it’s smart to start at least two months ahead. That gives us room for the conversations, the sketches, and the refinements without rushing the art.
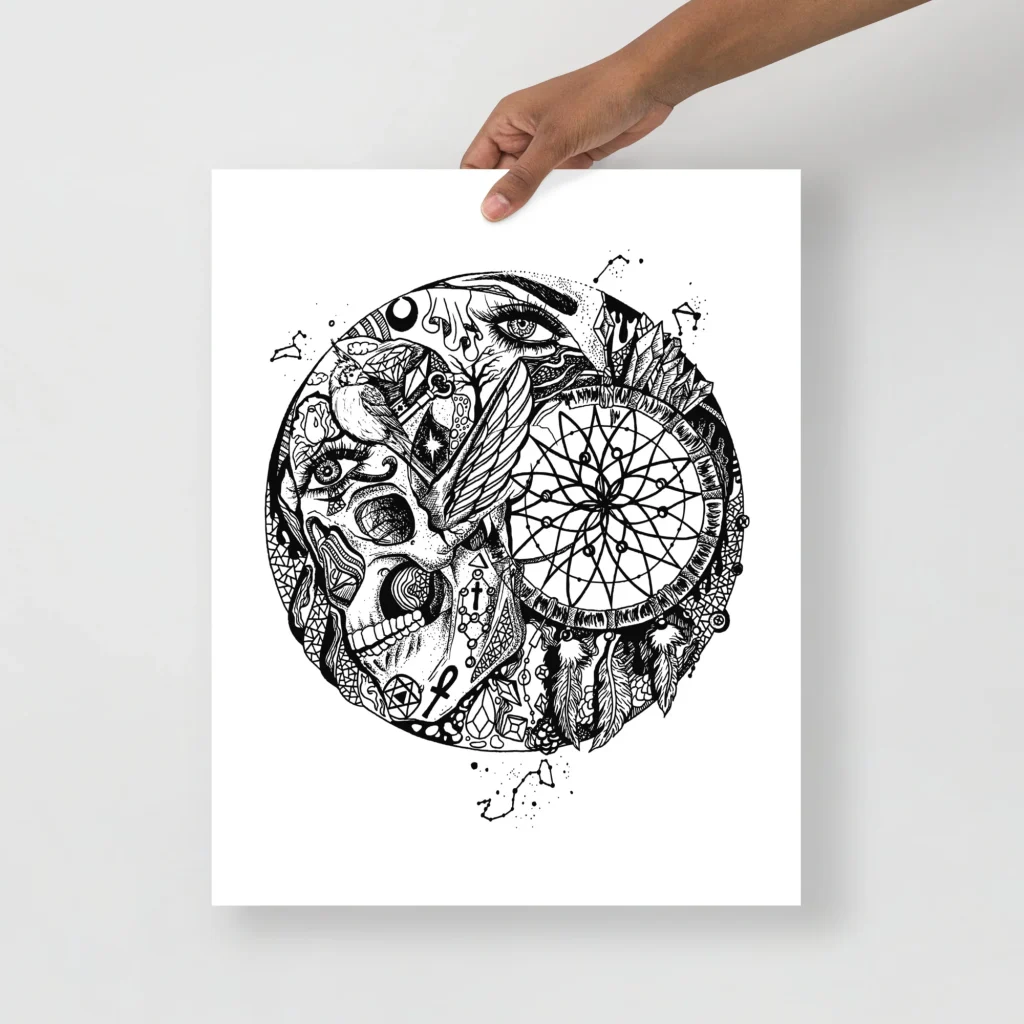
My Skull and Dreamcatcher Pen Ink Art Print balances organic, flowing elements — the dreamcatcher’s web and feathers — against the bold graphic weight of a skull rendered in pure pen and ink. Designs like this need that full timeline to get right. Rushing the layering of fine lines and intricate detail would show in the final piece, and on your skin forever.
This is also why a hand-drawn commission makes such a meaningful present. I’ve drawn pieces a sister gave her brother to mark a milestone, designs people gifted to a parent, and tributes someone carries for a friend they lost. When you’re honoring a person or a memory that matters, the weeks it takes are part of what makes the gesture land.
Ready to Start Your Custom Tattoo Design?
If reading through this process feels right — like you’re ready to invest in original ink instead of settling for flash off a wall — reach out through my tattoo commission page. Tell me what you’re carrying and where you’re stuck. I’ll figure it out with you, one line at a time, the same way every piece on this page began.
For the full picture of what tattoo commission art actually means and why people choose it, you might also want to read why a tattoo commission beats any flash design.